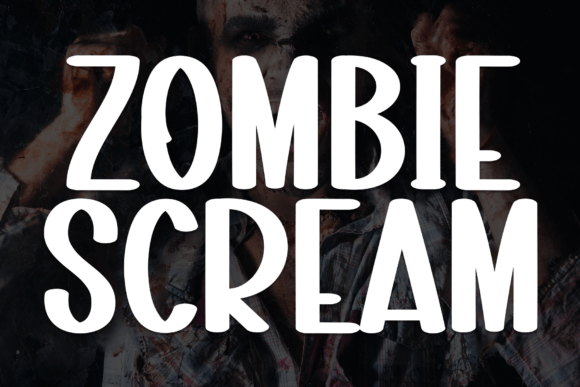
Zombie Scream: A Web Designer’s Review of This Spooky Display Font
Last week, I was building a landing page for a limited-edition Halloween collection. The client wanted something that felt less polished and more visceral—like a handwritten note from a horror movie. I opened up my font library, pulled up Zombie Scream, and dropped it into the hero section headline. The transformation was immediate. The thick, messy marker strokes brought a raw energy that no standard sans-serif could replicate. This is a review of putting Zombie Scream through its paces in a real web design workflow, from desktop hero banners to mobile responsiveness.
Testing Zombie Scream in a Real Landing Page Hero Section
I applied Zombie Scream to the main H1 tag of a boutique store’s seasonal microsite. The headline was short—“Shop the Haunt”—and the font immediately became the focal point. Over a dark, atmospheric background image, the bold white text stood out sharply. The marker texture added a tactile quality to the digital space, making the page feel more like a physical poster than a standard website. I tested it on a 27-inch monitor, and the impact was strong. The font’s generous x-height helps with legibility even at larger display sizes, which is a critical factor for a display font used in a hero section. The uneven edges and slight ink bleed effect gave the design an authentic, hand-drawn personality that perfectly matched the client’s need for a “creepy vibe” without looking cheap or cartoonish.
From a UX perspective, the font immediately establishes a mood. Visitors don’t need to read a single word of body copy to understand the brand’s tone. That’s the power of using a distinct display font like Zombie Scream in a high-visibility area. It acts as an anchor for the entire visual identity of the page. I also tested it on a light background with dark text, and the contrast was equally effective. The marker strokes maintain their texture regardless of the color scheme, though I found that pairing it with high-contrast backgrounds (like pure black, deep crimson, or stark white) made the messy details pop the most.
Where Zombie Scream Works Best in a Digital Layout
Zombie Scream is not a workhorse font. It’s a decorative display font meant for short, impactful statements. After testing it across several mockups, I found it performed best in the following specific web elements:
- Hero Headlines and Section Titles: Perfect for main titles. Keep the word count under 10 words for maximum clarity. The bold strokes create a strong visual anchor.
- Call-to-Action Buttons: Using it on a “Buy Now” or “Enter If You Dare” button added character. However, I had to ensure the button padding was generous enough to accommodate the thick strokes without crowding.
- Banner Text and Image Overlays: Great for overlaying on dark, atmospheric images. The font’s texture makes it look like it was painted directly onto the photo.
- Campaign Landing Pages: Ideal for microsites or seasonal pages where you want to break away from the standard brand guidelines and inject a specific mood.
- Social Media Graphics and Digital Ads: The font’s boldness ensures it remains readable even in small ad formats like Instagram stories or banner ads.
Responsive Behavior and Mobile Readability Tips
A crucial test for any web design project is how a font performs on mobile devices. I previewed Zombie Scream on a 375px screen width. The good news is that the bold weight holds up well. However, because the font is designed to look messy, the strokes can feel crowded at smaller sizes. I had to adjust the font-size and letter-spacing to maintain readability. Adding a small amount of letter-spacing (0.02em to 0.05em) significantly improved the clarity of the text without losing the hand-drawn charm. I also avoided using it on dark backgrounds with low contrast on mobile, as the texture can get lost in the shadows. A light-on-dark approach worked best for maintaining the creepy vibe without sacrificing legibility.
From a performance standpoint, the font file was reasonable. I converted it to WOFF2 format for optimal loading speed. Since it’s a single weight display font, it doesn’t bloat the page load time if used sparingly. I recommend using it only for the hero or primary headings, and relying on a lightweight sans-serif for the rest of the content. This keeps the CSS clean and the layout fast. One limitation I noticed is that the font is highly decorative, so it’s not suitable for small interface text like navigation links, footer menus, or form labels. Trying to force it into those roles will harm accessibility and user experience, as the messy strokes make it difficult to read at very small sizes. Stick to larger point sizes for the best results.
Pairing Zombie Scream with a Clean Body Font
Since Zombie Scream is highly decorative, it needs a calm, readable counterpart to balance the visual hierarchy. During my tests, I paired it with a clean sans-serif font—specifically Inter and Montserrat. The neutral, geometric shapes of the sans-serif allowed Zombie Scream to take center stage without creating visual chaos. For a more editorial feel, a simple serif like Merriweather or Lora could work, but the sans-serif pairing felt more modern and web-friendly. The key is to give the body copy plenty of breathing room. I used a line-height of 1.6 or higher, and maintained a generous margin around the headings to let the display font breathe.
When building a brand identity around a font like Zombie Scream, consistency is crucial. Use the font for the hero headline and maybe one or two section headers, but let the simpler sans-serif handle the bulk of the information. This creates a clear visual hierarchy where the user’s eye is drawn to the bold, expressive display text first, and then flows naturally into the clean, readable body copy. It’s a classic font pairing strategy that works well for boutique online stores, coaching websites, creative portfolios, and campaign landing pages that need a strong personality.
Licensing, File Formats, and Web Implementation
Before committing to a commercial font like Zombie Scream for a client project, I always check the licensing terms. Purchasing a license that covers web use is essential. This typically includes WOFF and WOFF2 file formats, which are the standard for modern websites. I recommend self-hosting the font files to control loading speed and privacy, rather than relying on a third-party CDN. The font’s license usually specifies the number of page views or domains, so read the terms carefully if you’re using it for a high-traffic client site. Also, check if the font includes multilingual support. If your project targets a global audience, ensure the character set covers your needs.
Implementation is straightforward. You can use @font-face in your CSS to load the font files, or use a plugin if you’re working with a CMS like WordPress or Shopify. I tested it on a static HTML page and a React-based landing page, and it performed well in both environments. The only caveat is that because it’s a highly textured display font, it may not render perfectly in older browsers that lack support for advanced font features. However, for modern web design, it’s a robust choice. Zombie Scream is a fantastic addition to a web designer’s toolkit for specific, personality-driven projects. It’s not a font for every job, but when you need a bold, spooky, hand-drawn marker aesthetic, it delivers. If you’re working on a Halloween campaign, a horror-themed brand, or any project that needs a loud, messy, and fun voice, Zombie Scream is worth downloading and testing in your own mockups. It will give your digital layouts the creative edge you’re looking for.